STscript Language Reference
What is STscript?
It's a simple yet powerful scripting language that could be used to expand the functionality of SillyTavern without serious coding, allowing you to:
- Create mini-games or speed run challenges
- Build AI-powered chat insights
- Unleash your creativity and share with others
STscript is built using the slash commands engine, utilizing command batching, data piping, macros, and variables. These concepts are going to be described in the following document.
Security precaution
With great power comes great responsibility. Be careful and always inspect the scripts before executing them.
Hello, World!
To run your first script, open any SillyTavern chat and type the following into the chat input bar:
/pass Hello, World! | /echo |
|---|
You should see the message in the toast on top of the screen. Now let's break it down bit by bit.
A script is a batch of commands, each one starting with the slash, with or without named and unnamed arguments, and terminated with the command separator character: |.
Commands are executed sequentially, one after another, and transfer data between each other.
- The
/passcommand accepts a constant value of "Hello, World!" as an unnamed argument and writes it to the pipe. - The
/echocommand receives the value through the pipe from the previous command and displays it as a toast notification.
Hint: To see a list of all available commands, type /help slash into the chat.
As constant unnamed arguments and pipes are interchangeable, we could rewrite this script simply as:
/echo Hello, World!User input
Now let's add a little bit of interactivity to the script. We will accept the input value from the user and display it in the notification.
/input Enter your name |
/echo Hello, my name is {{pipe}}- The
/inputcommand is used to display an input box with the prompt specified in the unnamed argument and then writes the output to the pipe. - Because
/echoalready has an unnamed argument that sets the template for the output, we use the{{pipe}}macro to specify a place where the pipe value will be rendered.
 |
 |
|---|
Other input/output commands
/popup (text)— shows a blocking popup, supports lite HTML formatting, e.g:/popup <font color=red>I'm red!</font>./setinput (text)— replaces the contents of the user input bar with the provided text./speak voice="name" (text)— narrates the text using the selected TTS engine and the character name from the voice map, e.g./speak name="Donald Duck" Quack!./buttons labels=["a","b"] (text)— shows a blocking popup with the specified text and button labels.labelsmust be a JSON-serialized array of strings or a variable name containing such an array. Returns the clicked button label into the pipe or empty string if canceled. The text supports lite HTML formatting./beep— plays the message notification sound.
Arguments for /popup and /input
/popup and /input support the following additional named arguments:
large=on/off- increases the vertical size of the popup. Default:off.wide=on/off- increases the horizontal size of the popup. Default:off.okButton=string- adds ability to customize the text on the "Ok" button. Default:Ok.rows=number- (only for/input) increases the size of the input control. Default: 1.placeholder=string- sets placeholder text in the input field.tooltip=string- sets a tooltip displayed on hover.icon=string- sets a Font Awesome icon class for the popup.
Example:
/popup large=on wide=on okButton="Accept" Please accept our terms and conditions....Arguments for /echo
/echo supports the following values for the additional severity argument that sets the style of the displayed message.
warningerrorinfo(default)success
Example:
/echo severity=error Something really bad happened.Variables
Variables are used to store and manipulate data in scripts, using either commands or macros. The variables could be one of the following types:
- Local variables — saved to the metadata of the current chat, and unique to it.
- Global variables — saved to the settings.json and exist everywhere across the app.
/getvar nameor{{getvar::name}}— gets the value of the local variable./setvar key=name valueor{{setvar::name::value}}— sets the value of the local variable./addvar key=name incrementor{{addvar::name::increment}}— adds theincrementto the value of the local variable./incvar nameor{{incvar::name}}— increments a value of the local variable by 1./decvar nameor{{decvar::name}}— decrements a value of the local variable by 1./getglobalvar nameor{{getglobalvar::name}}— gets the value of the global variable./setglobalvar key=nameor{{setglobalvar::name::value}}— sets the value of the global variable./addglobalvar key=nameor{{addglobalvar::name:increment}}— adds theincrementto the value of the global variable./incglobalvar nameor{{incglobalvar::name}}— increments a value of the global variable by 1./decglobalvar nameor{{decglobalvar::name}}— decrements a value of the global variable by 1./flushvar name— deletes the value of the local variable./flushglobalvar name— deletes the value of the global variable.
- The default value of previously undefined variables is an empty string or a zero of it is first used in the
/addvar,/incvar,/decvarcommand. - Increment in the
/addvarcommand performs an addition or subtraction of the value if both increment and the variable value can be converted to a number, or otherwise does the string concatenation. - If a command argument accepts a variable name and both local and global variables exist with the same name, then the local variable takes priority.
- All slash commands for variable manipulation write the resulting value into the pipe for the next command to use.
- For macros, only the "get", "inc", and "dec" type macro returns the value, "add" and "set" are replaced with an empty string instead.
Now, let's consider the following example:
/input What do you want to generate? |
/setvar key=SDinput |
/echo Requesting an image of {{getvar::SDinput}} |
/getvar SDinput |
/imagine- The value of the user input is saved in the local variable named
SDinput. - The
getvarmacro is used to display the value in the/echocommand. - The
getvarcommand is used to retrieve the value of the variable and pass it through the pipe. - The value is passed to the
/imaginecommand (provided by the Image Generation plugin) to be used as its input prompt.
Since the variables are saved and not flushed between the script executions, you can reference the variable in other scripts and via macros, and it will resolve to the same value as during the execution of the example script. To guarantee that the value will be discarded, add the /flushvar command to the script.
Arrays and objects
Variable values can contain JSON-serialized arrays or key-value pairs (objects).
Examples:
- Array:
["apple","banana","orange"] - Object:
{"fruits":["apple","banana","orange"]}
The following modifications can be applied to commands to work with these variables:
/lencommand gets a number of items in the array.index=number/stringnamed argument can be added/getvaror/setvarand their global counterparts to get or set sub-values by either a zero-based index for arrays or a string key for objects.- If a numeric index is used on a nonexistent variable, the variable will be created as an empty array
[]. - If a string index is used on a nonexistent variable, the variable will be created as an empty object
{}.
- If a numeric index is used on a nonexistent variable, the variable will be created as an empty array
/addvarand/addglobalvarcommands support pushing a new value to array-typed variables.
Flow control - conditionals
You can use the /if command to create conditional expressions that branch the execution based on the defined rules.
/if left=valueA right=valueB rule=comparison else={: /echo (command on false) :} {: /echo (command on true) :}Note that
/if left=valueA right=valueB rule=comparison else="(command on false)" "(command on true)"syntax is also supported, however {: closures :} will help you write cleaner scripts.
Let's review the following example:
/input What's your favorite drink? |
/if left={{pipe}} right="black tea" rule=eq else={: /echo You shall not pass | /abort :} {: /echo Welcome to the club, {{user}} :}
This script evaluates the user input against a required value and displays different messages, depending on the input value.
Arguments for /if
leftis the first operand. Let's call it A.rightis the second operand. Let's call it B.ruleis the operation to be applied to the operands.elseis the optional string of subcommands to be executed if the result of boolean comparison is false.- Unnamed argument is the subcommand to be executed if the result of boolean comparison is true.
The operand values are evaluated in the following order:
- Numeric literals
- Local variable names
- Global variable names
- String literals
String values of named arguments could be escaped with quotes to allow multi-word strings. Quotes are then discarded.
Boolean operations
Supported rules for boolean comparison are the following. An operation applied to the operands results in either a true or false value.
eq(equals) => A = Bneq(not equals) => A != Blt(less than) => A < Bgt(greater than) => A > Blte(less than or equals) => A <= Bgte(greater than or equals) => A >= Bnot(unary negation) => !Ain(includes substring) => A includes B, case insensitivenin(not includes substring) => A not includes B, case insensitive
Subcommands
A subcommand is a string containing a list of slash commands to execute.
- To use command batching in subcommands, the command separator character should be escaped (see below).
- Since macro values are executed when the conditional is entered, not when the subcommand is executed, a macro could be additionally escaped to delay their evaluation to the subcommand execution time.
- The result of the subcommands execution is piped to the command after
/if. - The
/abortcommand interrupts the script execution when encountered.
/if commands can be used as a ternary operator.
The following example will pass a "true" string to the next command the variable a equals 5, and a "false" string otherwise.
/if left=a right=5 rule=eq else={: /pass false:} {: /pass true :} |
/echo
Escape Sequences
Macros
Escaping of macros works just like before. However, with closures, you will need to escape macros a lot less often than before. Either escape the two opening curly braces, or both the opening and closing pair.
/echo \{\{char}} |
/echo \{\{char\}\}
Pipes
Pipes don't need to be escaped in closures (when used as command separators). Everywhere where you want to use a literal pipe character instead of a command separator, you need to escape it.
/echo title="a\|b" c\|d |
/echo title=a\|b c\|d |
With the parser flag STRICT_ESCAPING you don't need to escape pipes in quoted values.
/parser-flag STRICT_ESCAPING |
/echo title="a|b" c\|d |
/echo title=a\|b c\|d |
Quotes
To use a literal quote-character inside a quoted value, the character must be escaped.
/echo title="a \"b\" c" d "e" fSpaces
To use space in the value of a named argument, you either have to surround the value in quote, or escape the space character.
/echo title="a b" c d |
/echo title=a\ b c d
Closure Delimiters
If you want to use the character combinations used to mark the beginning or end of a closure, you have to escape the sequence with a single backslash.
/echo \{: |
/echo \:}
Pipe Breakers
||To prevent the previous command's output from being automatically injected as the unnamed argument into the next command, put double pipes between the two commands.
/echo we don't want to pass this on ||
/world
Closures
{: ... :}Closures (block statements, lambdas, anonymous functions, whatever you want to call them) are a series of commands wrapped between {: and :}, that are only evaluated once that part of the code is executed.
Sub-Commands
Closures make using sub-commands a lot easier and get rid of the need to escape pipes and macros.
// if without closures |
/if left=1 rule=eq right=1
    else="
        /echo not equal \|
        /return 0
    "
    /echo equal \|
/return \{\{pipe}}// if with closures |
/if left=1 rule=eq right=1
else={:
/echo not equal |
/return 0
:}
{:
/echo equal |
/return {{pipe}}
:}Scopes
Closures have their own scope and support scoped variables. Scoped variables are declared with /let, their values set and retrieved with /var. Another way to get a scoped variable is the {{var::}} macro.
/let x |
/let y 2 |
/var x 1 |
/var y |
/echo x is {{var::x}} and y is {{pipe}}.
Within a closure, you have access to all variables declared within that same closure or in one of its ancestors. You don't have access to variables declared in a closure's descendants.
If a variable is declared with the same name as a variable that was declared in one of the closure's ancestors, you don't have access to the ancestor variable in this closure and its descendants.
/let x this is root x |
/let y this is root y |
/return {:
    /echo called from level-1: x is "{{var::x}}" and y is "{{var::y}}" |
    /delay 500 |
    /let x this is level-1 x |
    /echo called from level-1: x is "{{var::x}}" and y is "{{var::y}}" |
    /delay 500 |
    /return {:
        /echo called from level-2: x is "{{var::x}}" and y is "{{var::y}}" |
        /let x this is level-2 x |
        /echo called from level-2: x is "{{var::x}}" and y is "{{var::y}}" |
        /delay 500
    :}()
:}() |
/echo called from root: x is "{{var::x}}" and y is "{{var::y}}"
Named Closures
/let x {: ... :} | /:xClosures can be assigned to variables (only scoped variables) to be called at a later point or to be used as sub-commands.
/let myClosure {:
    /echo this is my closure
:} |
/:myClosure/let myClosure {:
/echo this is my closure |
/delay 500
:} |
/times 3 {{var::myClosure}}/: can also be used to execute Quick Replies, as it is just a shorthand for /run.
/:QrSetName.QrButtonLabel |
/run QrSetName.QrButtonLabel
Closure Arguments
Named closures can take named arguments, just like slash commands. The arguments can have default values.
/let myClosure {: a=1 b=
    /echo a is {{var::a}} and b is {{var::b}}
:} |
/:myClosure b=10
Closures and Piped Arguments
The piped value from a parent closure will not be automatically injected into the first command of a child closure.
You can still explicitly reference the parent's piped value with {{pipe}}, but if you leave the unnamed argument of the first command inside a closure blank, the value will not be automatically injected.
/* This used to attempt to change the model to "foo"
   because the value "foo" from the /echo outside of
   the loop was injected into the /model command
   inside of the loop.
   Now it will simply echo the current model without
   attempting to change it.
*|
/echo foo |
/times 2 {:
	/model |
	/echo |
:} |/* You can still recreate the old behavior by
explicitly using the {{pipe}} macro.
*|
/echo foo |
/times 2 {:
/model {{pipe}} |
/echo |
:} |Immediately Executed Closures
{: ... :}()Closures can be immediately executed, meaning they will be replaced with their return value. This is helpful in places where no explicit support for closures exists, and to shorten some commands that would otherwise require a lot of intermediate variables.
// a simple length comparison of two strings without closures |
/len foo |
/var lenOfFoo {{pipe}} |
/len bar |
/var lenOfBar {{pipe}} |
/if left={{var::lenOfFoo}} rule=eq right={{var:lenOfBar}} /echo yay!// the same comparison with immediately executed closures |
/if left={:/len foo:}() rule=eq right={:/len bar:}() /echo yay!In addition to running named closures saved inside scoped variables, the /run command can also be used to execute closures immediately.
/run {:
	/add 1 2 3 4 |
:} |
/echo |
Comments
A comment is a human-readable explanation or annotation in the script code. Comments don't break pipes.
// this is a comment |
/echo foo |
/# this is also a comment
Block Comments
Block comments can be used to quickly comment out multiple commands at once. They will not terminate on a pipe.
/echo foo |
/*
/echo bar |
/echo foobar |
*|
/echo foo again |
Flow Control
Loops: /while and /times
If you need to run some command in a loop until a certain condition is met, use the /while command.
/while left=valueA right=valueB rule=operation guard=on "commands"On each step of the loop it compares the value of variable A with the value of variable B, and if the condition yields true, then executes any valid slash command enclosed in quotes, otherwise exists the loop. This command doesn't write anything to the output pipe.
Arguments for /while
The set of available boolean comparisons, handing of variables, literal values, and subcommands is the same as for the /if command.
The optional guard named argument (on by default) is used to protect against endless loops, limiting the number of iterations to 100.
To disable and allow endless loops, set guard=off.
This example adds 1 to the value of i until it reaches 10, then outputs the resulting value (10 in this case).
/setvar key=i 0 |
/while left=i right=10 rule=lt "/addvar key=i 1" |
/echo {{getvar::i}} |
/flushvar i
Arguments for /times
Runs a subcommand a specified number of times.
/times (repeats) "(command)" – any valid slash command enclosed in quotes repeats a number of times, e.g. /setvar key=i 1 | /times 5 "/addvar key=i 1" adds 1 to the value of "i" 5 times.
- {{timesIndex}} is replaced with the iteration number (zero-based), e.g.
/times 4 {:/echo {{timesIndex}}:}echoes the numbers 0 through 4. - Loops are limited to 100 iterations by default, pass
guard=offto disable.
Breaking out of Loops and Closures
/break |The /break command can be used to break out of a loop (/while or /times) or a closure early. The unnamed argument of /break can be used to pass a value different from the current pipe along.
/break is currently implemented in the following commands:
/while- exits the loop early/times- exits the loop early/run(with a closure or closure via variable) - exits the closure early/:(with a closure) - exits the closure early
/times 10 {:
	/echo {{timesIndex}}
	/delay 500 |
	/if left={{timesIndex}} rule=gt right=3 {:
		/break
	:} |
:} |/let x {: iterations=2
/if left={{var::iterations}} rule=gt right=10 {:
/break too many iterations! |
:} |
/times {{var::iterations}} {:
/delay 500 |
/echo {{timesIndex}} |
:} |
:} |
/:x iterations=30 |
/echo the final result is: {{pipe}}/run {:
/break 1 |
/pass 2 |
:} |
/echo pipe will be one: {{pipe}} |/let x {:
/break 1 |
/pass 2 |
:} |
/:x |
/echo pipe will be one: {{pipe}} |Math operations
- All of the following operations accept a series of numbers or variable names and output the result to the pipe.
- Invalid operations (such as division by zero), and operations that result in a NaN value or infinity return zero.
- Multiplication, addition, minimum and maximum accept an unlimited number of arguments separated by spaces.
- Subtraction, division, exponentiation, and modulo accept two arguments separated by spaces.
- Sine, cosine, natural logarithm, square root, absolute value, and rounding accept one argument.
List of operations:
/add (a b c d)– performs an addition of the set of values, e.g./add 10 i 30 j/mul (a b c d)– performs a multiplication of the set of values, e.g./mul 10 i 30 j/max (a b c d)– returns a maximum from the set of values, e.g./max 1 0 4 k/min (a b c d)– return a minimum from the set of values, e.g./min 5 4 i 2/sub (a b)– performs a subtraction of two values, e.g./sub i 5/div (a b)– performs a division of two values, e.g./div 10 i/mod (a b)– performs a modulo operation of two values, e.g./mod i 2/pow (a b)– performs a power operation of two values, e.g./pow i 2/sin (a)– performs a sine operation of a value, e.g./sin i/cos (a)– performs a cosine operation of a value, e.g./cos i/log (a)– performs a natural logarithm operation of a value, e.g./log i/abs (a)– performs an absolute value operation of a value, e.g./abs -10/sqrt (a)– performs a square root operation of a value, e.g./sqrt 9/round (a)– performs a rounding to the nearest integer operation of a value, e.g./round 3.14/rand (round=round|ceil|floor from=number=0 to=number=1)– returns a random number between from and to, e.g./randor/rand 10or/rand from=5 to=10. Ranges are inclusive. The returned value will contain a fractional part. Useroundnamed argument to get an integral value, e.g./rand round=ceilto round up,round=floorto round down, andround=roundto round to nearest.
Example 1: get an area of a circle with a radius of 50.
/setglobalvar key=PI 3.1415 |
/setvar key=r 50 |
/mul r r PI |
/round |
/echo Circle area: {{pipe}}
Example 2: calculate a factorial of 5.
/setvar key=input 5 |
/setvar key=i 1 |
/setvar key=product 1 |
/while left=i right=input rule=lte "/mul product i \| /setvar key=product \| /addvar key=i 1" |
/getvar product |
/echo Factorial of {{getvar::input}}: {{pipe}} |
/flushvar input |
/flushvar i |
/flushvar product
Using the LLM
Scripts can make requests to your currently connected LLM API using the following commands:
/gen (prompt)— generates text using the provided prompt for the selected character and including chat messages./genraw (prompt)— generates text using just the provided prompt, ignoring the current character and chat./trigger— triggers a normal generation (equivalent to clicking a "Send" button). If in group chat, you can optionally provide a 1-based group member index or a character name to have them reply, otherwise triggers a group round according to the group settings./swipe— triggers a swipe on the last character message./regenerate— regenerates the last character message./continue— attempts to continue the last message.
Arguments for /gen and /genraw
/genraw lock=on/off stop=[] instruct=on/off (prompt)lock— can beonoroff. Specifies whether a user input should be blocked while the generation is in progress. Default:off.stop— JSON-serialized array of strings. Adds a custom stop string (if the API supports it) just for this generation. Default: none.instruct(only/genraw) — can beonoroff. Allows to use instruct formatting on the input prompt (if instruct mode is enabled and the API supports it). Set tooffto force pure prompts. Default:on.as(for Text Completion APIs) — can besystem(default) orchar. Defines how the last prompt line will be formatted.charwill use a character name,systemwill use no or neutral name.
The generated text is then passed through the pipe to the next command and can be saved to a variable or displayed using the I/O capabilities:
/genraw Write a funny message from Cthulhu about taking over the world. Use emojis. |
/popup <h3>Cthulhu says:</h3><div>{{pipe}}</div> |
|---|
or to insert the generated message as a response from your character:
/genraw You have been memory wiped, your name is now Lisa and you're tearing me apart. You're tearing me apart Lisa! |
/sendas name={{char}} {{pipe}}
Temporal character
If you are not in a group chat, scripts may temporarily make a request to the currently connected LLM as a different character.
/ask (prompt)— generates text using the provided prompt for a specified character and including chat messages. Please note that swipes of the response from this character will revert back to the current character.
/ask name=... (prompt)Arguments for /ask
name— Required. The name of the character to ask (or a unique character identifier, such as an avatar key). This must be provided as a named argument.return— Specifies how the return value should be provided. Defaults topipe(output via the command pipe). Other options can be specified if supported by the API.
/ask name=Alice What is your favorite color?Prompt injections
Scripts can add custom LLM prompt injections, making it essentially an equivalent of unlimited Author's Notes.
/inject (text)— inserts any text into the normal LLM prompt for the current chat, and requires a unique identifier. Saved to chat metadata./listinjects— shows a list of all prompt injections added by scripts for the current chat in a system message./flushinjects— deletes all prompt injections added by scripts for the current chat./note (text)— sets the Author's Note value for the current chat. Saved to chat metadata./interval— sets the Author's Note insertion interval for the current chat./depth— sets the Author's Note insertion depth for the in-chat position./position— sets the Author's Note position for the current chat.
Arguments for /inject
/inject id=IdGoesHere position=chat depth=4 My prompt injectionid— an identifier string or a reference to a variable. Consequent calls of/injectwith the same ID will overwrite the previous text injection. Required argument.position— sets a position for the injection. Default:after. Possible values:after: after the main prompt.before: before main prompt.chat: in-chat.
depth— sets an injection depth for the in-chat position. 0 means insertion after the last message, 1 - before the last message, etc. Default: 4.- Unnamed argument is a text to be injected. An empty string will unset the previous value for the provided identifier.
Access chat messages
Read messages
You can access messages in the currently selected chat using the /messages command.
/messages names=on/off start-finish- The
namesargument is used to specify whether you want to include character names or not, default:on. - In an unnamed argument, it accepts a message index or range in the
start-finishformat. Ranges are inclusive! - If the range is unsatisfiable, i.e. an invalid index or more messages than exist are requested, then an empty string is returned.
- Messages that are hidden from the prompt (denoted by the ghost icon) are excluded from the output.
- If you want to know the index of the latest message, use the
{{lastMessageId}}macro, and{{lastMessage}}will get you the message itself.
To calculate the start index for a range, for example, when you need to get the last N messages, use variable subtraction. This example will get you 3 last messages in the chat:
/setvar key=start {{lastMessageId}} |
/addvar key=start -2 |
/messages names=off {{getvar::start}}-{{lastMessageId}} |
/setinput
Send messages
A script can send messages as either a user, character, persona, neutral narrator, or add comments.
/send (text)— adds a message as the currently selected persona./sendas name=charname (text)— adds a message as any character, matching by their name.nameargument is required. Use the{{char}}macro to send as the current character./sys (text)— adds a message from the neutral narrator that doesn't belong to the user or character. The displayed name is purely cosmetic and can be customized with the/sysnamecommand./comment (text)— adds a hidden comment that is displayed in the chat but is not visible to the prompt./addswipe (text)— adds a swipe to the last character message. Can't add a swipe to the user or hidden messages./hide (message id or range)— hides one or several messages from the prompt based on the provided message index or inclusive range in thestart-finishformat./unhide (message id or range)— returns one or several messages to the prompt based on the provided message index or inclusive range in thestart-finishformat.
/send, /sendas, /sys, and /comment commands optionally accept a named argument at with a zero-based numeric value (or a variable name that contains such a value) that specifies an exact position of message insertion. By default new messages are inserted at the end of the chat log.
This will insert a user message at the beginning of the conversation history:
/send at=0 Hi, I use Linux.Delete messages
These commands are potentially destructive and have no "undo" function. Check the /backups/ folder if you accidentally deleted something important.
/cut (message id or range)— cuts one or several messages from the chat based on the provided message index or inclusive range in thestart-finishformat./del (number)— deletes last N messages from the chat./delswipe (1-based swipe id)— deletes a swipe from the last character message based on the provided 1-based swipe ID./delname (character name)— deletes all messages in the current chat that belong to a character with the specified name./delchat— deletes the current chat.
Character management commands
/char-create— creates a new character using the data provided with named arguments./char-update— updates the current character using the data provided with named arguments./char-get— retrieves the current character's data as a JSON object and passes it to the pipe./char-delete (name)— deletes the character with the specified name./char-duplicate (name)— duplicates the character with the specified name./tag-import (name)— imports tags from a character card file.
Loader commands
The loader system provides a reusable overlay for time consuming tasks that should provide visual feedback and/or temporarily block the UI.
/loader-show (text)— shows a loading overlay with the specified text./loader-hide— hides the loading overlay./loader-wrap (closure)— shows a loading overlay, executes the provided closure, and hides the overlay when done./loader-stop— stops and removes the loading overlay.
World Info commands
World Info (also known as Lorebook) is a highly utilitarian tool for dynamically inserting data into the prompt. See the dedicated page for more detailed explanation: World Info.
/getchatbook– gets a name of the chat-bound World Info file or create a new one if it was unbound, and pass it down the pipe./findentry file=bookName field=fieldName [text]– finds a UID of the record from the specified file (or a variable pointing to a file name) using fuzzy matching of a field value with the provided text (default field:key) and passes the UID down the pipe, e.g./findentry file=chatLore field=key Shadowfang./getentryfield file=bookName field=field [UID]– gets a field value (default field:content) of the record with the UID from the specified World Info file (or a variable pointing to a file name) and passes the value down the pipe, e.g./getentryfield file=chatLore field=content 123./setentryfield file=bookName uid=UID field=field [text]– sets a field value (default field:content) of the record with the UID (or a variable pointing to UID) from the specified World Info file (or a variable pointing to a file name). To set multiple values for key fields, use a comma-delimited list as a text value, e.g./setentryfield file=chatLore uid=123 field=key Shadowfang,sword,weapon./createentry file=bookName key=keyValue [content text]– creates a new record in the specified file (or a variable pointing to a file name) with the key and content (both of these arguments are optional) and passes the UID down the pipe, e.g./createentry file=chatLore key=Shadowfang The sword of the king.
Valid entry fields
Logic values
- 0 = AND ANY
- 1 = NOT ALL
- 2 = NOT ANY
- 3 = AND ALL
Position values
- 0 = before main prompt
- 1 = after main prompt
- 2 = top of Author's Note
- 3 = bottom of Author's Note
- 4 = in-chat at depth
- 5 = top of example messages
- 6 = bottom of example messages
Role values (Position = 4 only)
- 0 = System
- 1 = User
- 2 = Assistant
Example 1: Read a content from the chat lorebook by key
/getchatbook | /setvar key=chatLore |
/findentry file={{getvar::chatLore}} field=key Shadowfang |
/getentryfield file={{getvar::chatLore}} field=key |
/echo
Example 2: Create a chat lorebook entry with key and content
/getchatbook | /setvar key=chatLore |
/createentry file={{getvar::chatLore}} key="Milla" Milla Basset is a friend of Lilac and Carol. She is a hush basset puppy who possesses the power of alchemy. |
/echo
Example 3: Expand an existing lorebook entry with new information from the chat
/getchatbook | /setvar key=chatLore |
/findentry file={{getvar::chatLore}} field=key Milla |
/setvar key=millaUid |
/getentryfield file={{getvar::chatLore}} field=content |
/setvar key=millaContent |
/gen lock=on Tell me more about Milla Basset based on the provided conversation history. Incorporate existing information into your reply: {{getvar::millaContent}} |
/setvar key=millaContent |
/echo New content: {{pipe}} |
/setentryfield file={{getvar::chatLore}} uid=millaUid field=content {{getvar::millaContent}}
Text manipulation
There's a variety of useful text manipulation utility commands to be used in various script scenarios.
/trimtokens— trims the input to the specified number of text tokens from the start or from the end and outputs the result to the pipe./trimstart— trims the input to the start of the first complete sentence and outputs the result to the pipe./trimend— trims the input to the end of the last complete sentence and outputs the result to the pipe./fuzzy— performs fuzzy matching of the input text to the list of strings, outputting the best string match to the pipe./regex name=scriptName [text]— executes a regex script from the Regex extension for the specified text. The script must be enabled.
Arguments for /trimtokens
/trimtokens limit=number direction=start/end (input)directionsets the direction for trimming, which can be eitherstartorend. Default:end.limitsets the amount of tokens to leave in the output. Can also specify a variable name containing the number. Required argument.- Unnamed argument is the input text to be trimmed.
Arguments for /fuzzy
/fuzzy list=["candidate1","candidate2"] (input)listis a JSON-serialized array of strings containing the candidates. Can also specify a variable name containing the list. Required argument.- Unnamed argument is the input text to be matched. Output is one of the candidates matching the input most closely.
Autocomplete
- Autocomplete is enabled both on the chat input, and the large Quick Reply editor.
- Autocomplete works anywhere in your input. Even with multiple piped commands and nested closures.
- Autocomplete supports three ways of looking up matching commands (User Settings -> STscript Matching).
- Starts with The "old" way. Only commands that begin exactly with the typed value will show up.
- Includes All commands that include the type value will show up. Example: When entering
/delete, the commands/qr-deleteand/qr-set-deletewill show up in the autocomplete list (/qr-delete, /qr-set-delete). - Fuzzy All commands that can be fuzzy-matched against the typed value will show up. Example: When entering
/seas, the command/sendaswill show up in the autocomplete list (/sendas).
- Command arguments are supported by autocomplete as well. The list will show up for required arguments automatically. For optional arguments, press Ctrl+Space to open the list of available options.
- When entering
/:to execute a closure or QR, autocomplete will show a list of scoped variables and QRs. - Autocomplete has limited support for macros (in slash commands). Type
{{to get a list of available macros. - Use the up and down arrow keys to select an option from the list of autocomplete options.
- Press Enter or Tab or click on an option to place the option at the cursor.
- Press Escape to close the autocomplete list.
- Press Ctrl+Space to open the autocomplete list or toggle the selected option's details.
Parser Flags
/parser-flagThe parser accepts flags to modify its behavior. These flags can be toggled on and off at any point in a script and all following input will be evaluated accordingly.
You can set your default flags in user settings.
Strict Escaping
/parser-flag STRICT_ESCAPING on |Changes with STRICT_ESCAPING enabled are as follows.
Pipes
Pipes don't need to be escaped in quoted values.
/echo title="a|b" c\|dBackslashes
A backslash in front of a symbol can be escaped to provide the literal backslash followed by the functional symbol.
// this will echo "foo \", then echo "bar" |
/echo foo \\|
/echo bar/echo \\|
/echo \\\|Replace Variable Macros
/parser-flag REPLACE_GETVAR on |This flag helps to avoid double-substitutions when the variable values contain text that could be interpreted as macros. The {{var::}} macros get substituted last and no further substitutions happen on the resulting text / variable value.
Replaces all {{getvar::}} and {{getglobalvar::}} macros with {{var::}}.
Behind the scenes, the parser will insert a series of command executors before the command with the replaced macros:
- call
/letto save the current{{pipe}}to a scoped variable - call
/getvaror/getglobalvarto get the variable used in the macro - call
/letto save the retrieved variable to a scoped variable - call
/returnwith the saved{{pipe}}value to restore the correct piped value for the next command
// the following will echo the last message's id / number |
/setvar key=x \{\{lastMessageId}} |
/echo {{getvar::x}}// this will echo the literal text {{lastMessageId}} |
/parser-flag REPLACE_GETVAR |
/setvar key=x \{\{lastMessageId}} |
/echo {{getvar::x}}Quick Replies: script library and auto-execution
Quick Replies is a built-in SillyTavern extension that provides an easy way to store and execute your scripts.
Configuring Quick Replies
In order to get started, enable open the extensions panel (stacked blocks icon), and expand the Quick Replies menu.
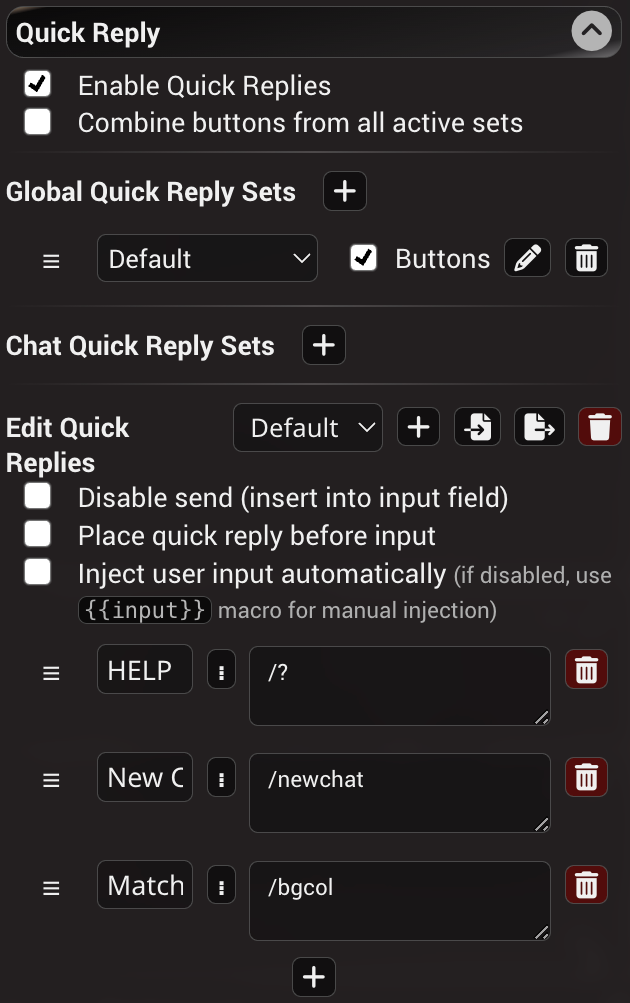
Quick Replies are disabled by default, you need to enable them first. Then you will see a bar appearing above your chat input bar.
You can set the displayed button text label (we recommend using emojis for brevity) and the script that will be executed when you click the button.
The number of buttons is controlled by the Number of slots settings (max = 100), adjust it according to your needs and click "Apply" when done.
Inject user input automatically recommended to be disabled when using STscript, otherwise it may interfere with your inputs, use the {{input}} macro to get the current value of the input bar in scripts instead.
Quick Reply presets allow to have multiple sets of predefined Quick Replies and switch between manually or by using the /qrset (name of set) command.
Don't forget to click "Update" before switching to a different set to write your changes to the currently used preset!
Manual execution
Now you can add your first script to the library. Pick any free slot (or create one), type "Click me" into the left box to set the label, then paste this into the right box:
/addvar key=clicks 1 |
/if left=clicks right=5 rule=eq else="/echo Keep going..." "/echo You did it!  \| /flushvar clicks"
Then click 5 times on the button that appeared above the chat bar.
Every click increments the variable clicks by one and displays a different message when the value equals 5 and resets the variable.
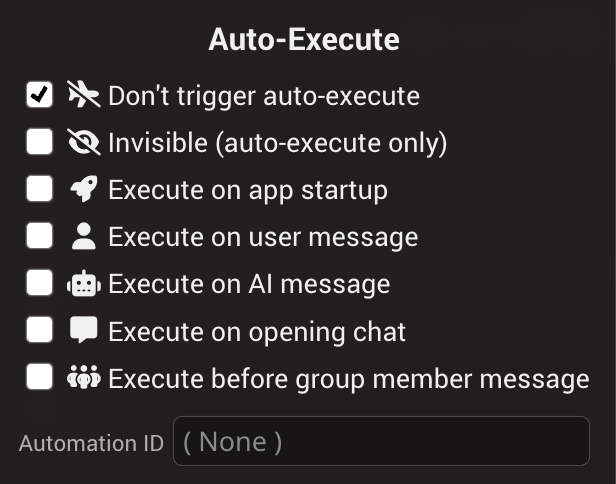
Automatic execution
Open the modal menu by clicking the ⋮ button for the created command.
 |
|---|
In this menu you can do the following:
- Edit the script in a convenient full-screen editor
- Hide the button from the chat bar, making it accessible only for auto-execution.
- Enable automatic execution on one or more of the following conditions:
- App startup
- Sending a user message to the chat
- Receiving an AI message in the chat
- Opening a character or group chat
- Triggering a reply from a group member
- Activating a World Info entry using the same Automation ID
- Provide a custom tool tip for the quick reply (text displayed when hovering over the quick reply in your UI)
- Execute the script for test purposes
Commands are executed automatically only if the Quick Replies extension is enabled.
For example, you can display a message after sending five user messages by adding the following script and setting it to auto-execute on the user message.
/addvar key=usercounter 1 |
/echo You've sent {{pipe}} messages. |
/if left=usercounter right=5 rule=gte "/echo Game over! \| /flushvar usercounter"
Debugger
A basic debugger exists inside the expanded Quick Reply editor. Set breakpoints with /breakpoint | anywhere in your script. When executing the script from the QR editor, the execution will be interrupted at that point, allowing you to examine the currently available variables, pipe, command arguments, and more, and to step through the rest of the code one by one.
/let x {: n=1
	/echo n is {{var::n}} |
	/mul n n |
:} |
/breakpoint |
/:x n=3 |
/echo result is {{pipe}} |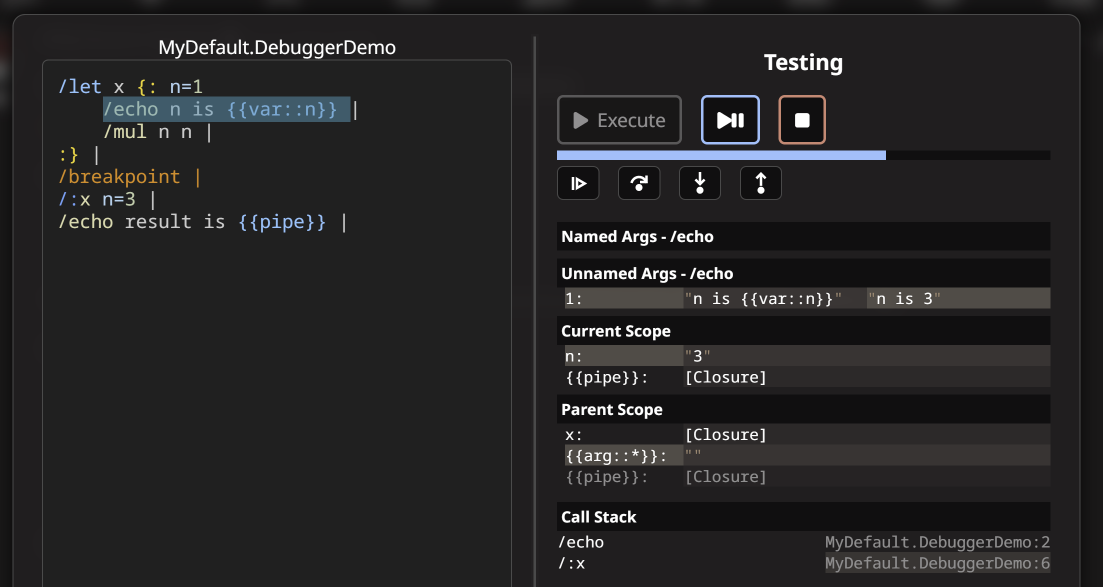 |
|---|
Calling procedures
A /run command can call scripts defined in the Quick Replies by their label, basically providing the ability to define procedures and return results from them. This allows to have reusable script blocks that other scripts could reference. The last result from the procedure's pipe is passed to the next command after it.
/run ScriptLabelLet's create two Quick Replies:
Label:
GetRandom
Command:
/pass {{roll:d100}}Label:
GetMessage
Command:
/run GetRandom | /echo Your lucky number is: {{pipe}}Clicking on the GetMessage button will call the GetRandom procedure which will resolve the {{roll}} macro and pass the number to the caller, displaying it to the user.
- Procedures do not accept named or unnamed arguments, but can reference the same variables as the caller.
- Avoid recursion when calling procedures as it may produce the "call stack exceeded" error if handled unadvisedly.
Calling procedures from a different Quick Reply preset
You can call a procedure from a different quick reply preset using the a.b syntax, where a = QR preset name and b = QR label name
/run QRpreset1.QRlabel1By default, the system will first look for a quick reply label a.b, so if one of your labels is literally "QRpreset1.QRlabel1" it will try to run that. If no such label is found, it will search for a QR preset name "QRpreset1" with a QR labeled "QRlabel1".
Quick Replies management commands
Create Quick Reply
/qr-create (arguments, [message])– creates a new Quick Reply, example:/qr-create set=MyPreset label=MyButton /echo 123
Arguments:
label- string - text on the button, e.g.,label=MyButtonset- string - name of the QR set, e.g.,set=PresetName1hidden- bool - whether the button should be hidden, e.g.,hidden=truestartup- bool - auto execute on app startup, e.g.,startup=trueuser- bool - auto execute on user message, e.g.,user=truebot- bool - auto execute on AI message, e.g.,bot=trueload- bool - auto execute on chat load, e.g.,load=truetitle- bool - title / tooltip to be shown on button, e.g.,title="My Fancy Button"
Delete Quick Reply
/qr-delete (set=string [label])– deletes Quick Reply
Update Quick Reply
/qr-update (arguments, [message])– updates Quick Reply, example:/qr-update set=MyPreset label=MyButton newlabel=MyRenamedButton /echo 123
Arguments:
newlabel- string - new text for the button, e.g.newlabel=MyRenamedButtonlabel- string - text on the button, e.g.,label=MyButtonset- string - name of the QR set, e.g.,set=PresetName1hidden- bool - whether the button should be hidden, e.g.,hidden=truestartup- bool - auto execute on app startup, e.g.,startup=trueuser- bool - auto execute on user message, e.g.,user=truebot- bool - auto execute on AI message, e.g.,bot=trueload- bool - auto execute on chat load, e.g.,load=truetitle- bool - title / tooltip to be shown on button, e.g.,title="My Fancy Button"
qr-get- retrieves all of a Quick Reply's properties, example:/qr-get set=myQrSet id=42
Create or update QR preset
/qr-presetupdate (arguments [label])or/qr-presetadd (arguments [label])
Arguments:
enabled- bool - enable or disable the presetnosend- bool - disable send / insert in user input (invalid for slash commands)before- bool - place QR before user inputslots- int - number of slotsinject- bool - inject user input automatically (if disabled use{{input}})
Create a new preset (overrides existing ones), example: /qr-presetadd slots=3 MyNewPreset
Add QR context menu
/qr-contextadd (set=string label=string chain=bool [preset name])– add context menu preset to a QR, example:/qr-contextadd set=MyPreset label=MyButton chain=true MyOtherPreset
Remove all context menus
/qr-contextclear (set=string [label])– remove all context menu presets from a QR, example:/qr-contextclear set=MyPreset MyButton
Remove one context menu
/qr-contextdel (set=string label=string [preset name])– remove context menu preset from a QR, example:/qr-contextdel set=MyPreset label=MyButton MyOtherPreset
Quick Reply value escaping
|{} can be escaped with backslash in the QR message / command.
For example, use /qr-create label=MyButton /getvar myvar \| /echo \{\{pipe\}\} to create a QR that calls /getvar myvar | /echo {{pipe}}.
Extension commands
SillyTavern extensions (both built-in, downloadable and third-party) can add their own slash command. Below is just an example of the capabilities in the official extensions. The list may be incomplete, make sure to check /help slash for the most complete list of available commands.
/websearch (query)— searches snippets of the web pages online for the specified query and returns the result into the pipe. Provided by the Web Search extension./imagine (prompt)— generates an image using the provided prompt. Provided by the Image Generation extension./emote (sprite)— sets a sprite for the active character by fuzzy matching its name. Provided by the Character Expressions extension./costume (subfolder)— sets a sprite set override for the active character. Provided by the Character Expressions extension./music (name)— force changes a played background music file by its name. Provided by the Dynamic Audio extension./ambient (name)— force changes a played ambient sound file by its name. Provided by the Dynamic Audio extension./roll (dice formula)— adds a hidden message to the chat with the result of a dice roll. Provided by the D&D Dice extension.
UI interaction
Scripts can also interact with SillyTavern's UI: navigate through the chats or change styling parameters.
Character navigation
/random— opens a chat with the random character./go (name)— opens a chat with the character of the specified name. First, searches for the exact name match, then by a prefix, then by a substring.
UI styling
/bubble— sets the message style to the "bubble chat" style./flat— sets the message style to the "flat chat" style./single— sets the message style to the "single document" style./movingui (name)— activates a MovingUI preset by name./resetui— resets the MovingUI panels state to their original positions./panels— toggles the UI panels visibility: top bar, left and right drawers./bg (name)— finds and sets a background using fuzzy names matching. Respect the chat background lock state./lockbg— locks the background image for the current chat./unlockbg— unlocks the background image for the current chat.
More examples
Generate chat summary (by @IkariDevGIT)
/setglobalvar key=summaryPrompt Summarize the most important facts and events that have happened in the chat given to you in the Input header. Limit the summary to 100 words or less. Your response should include nothing but the summary. |
/setvar key=tmp |
/messages 0-{{lastMessageId}} |
/trimtokens limit=3000 direction=end |
/setvar key=s1 |
/echo Generating, please wait... |
/genraw lock=on instruct=off {{instructInput}}{{newline}}{{getglobalvar::summaryPrompt}}{{newline}}{{newline}}{{instructInput}}{{newline}}{{getvar::s1}}{{newline}}{{newline}}{{instructOutput}}{{newline}}The chat summary:{{newline}} |
/setvar key=tmp |
/echo Done! |
/setinput {{getvar::tmp}} |
/flushvar tmp |
/flushvar s1
Buttons popup usage
Get Nth Fibonacci's number (using Binet's formula)
Hint: Set value of fib_no to the desired number
/setvar key=fib_no 5 |
/pow 5 0.5 | /setglobalvar key=SQRT5 |
/setglobalvar key=PHI 1.618033 |
/pow PHI fib_no | /div {{pipe}} SQRT5 |
/round |
/echo {{getvar::fib_no}}th Fibonacci's number is: {{pipe}}
Recursive Factorial (using closures)
/let fact {: n=
    /if left={{var::n}} rule=gt right=1
        else={:
            /return 1
        :}
        {:
            /sub {{var::n}} 1 |
            /:fact n={{pipe}} |
            /mul {{var::n}} {{pipe}}
        :}
:} |

/input Calculate factorial of: |
/let n {{pipe}} |
/:fact n={{var::n}} |
/echo factorial of {{var::n}} is {{pipe}}