#
VRM
This guide will walk you through the process of setting up and customizing the VRM extension for your SillyTavern experience. This extension allows you to use VRM animated models for your character, providing a dynamic and interactive element to your virtual character.
#
Prerequisites
Before you begin, ensure you've met the following prerequisites:
Branch Selection: Make sure you're using the latest version branch of SillyTavern to access the latest features and updates.
Extension Installation: Install the "VRM" extension from the "Download Extensions & Assets" menu in the Extensions panel (represented by the stacked blocks icon).
Model Folder Placement: Place your VRM model files (.vrm) into the
/data/<user-handle>/assets/vrm/modeldirectory and your animation files into the/data/<user-handle>/assets/vrm/animationdirectory. The currently supported animation file format are .fbx and .bvh that are compatible with VRM models. This include any animation you can get from Mixamo (https://www.mixamo.com/) and any animation you can export from tools like XR Animator (https://github.com/ButzYung/SystemAnimatorOnline).
#
Extension Settings
The VRM extension offers various settings to customize the behavior of your animated model. Here are the key settings:
#
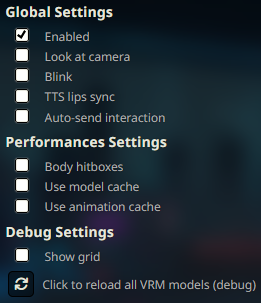
Global Settings
Enabled:
- Enable this checkbox to activate the extension, allowing your VRM model to interact within SillyTavern.
- You can disable the extension if you want to use normal sprites only.
Look at camera:
- Enable this checkbox to make the VRM model eyes look at the camera.
Blink:
- Enable this checkbox to make the VRM model eyes blink at random intervals. Model expressions should define properly blinking weight property otherwize model can blink with closed eyes for example, if that happens either:
- correct the model if you have the .vroid file
- don't use that incorrect face experession
- disable blinking completly with this checkbox
TTS Lip sync
- Enable this checkbox to have the VRM mouth movement follow the sound of your TTS when it's played. Only work with TTS whose sound is played by Sillytavern itself like XTTS (not in streaming mode). If disabled, mouth will be animated according to the message text length when a new character message is received.
Auto-send Interaction:
- Enable this checkbox to automatically trigger character interactions when you click on areas with mapped messages (refer to the hit areas section for details).
#
Performances Settings
Body hitboxes
- Enable this checkbox to activate detection of click on several part of the VRM model depending on the model the following area can be detected: head/chest/hands/groin/butt/legs/feets. Hitboxes location are computed at each frames and follow the body animation, disabling this option can improve performance.
Use model cache
- Enable this checkbox to keep in memory VRM model when switching models, allows to switch back to previous model faster. Usefull if you use different model for the same character to change outfit or form for example. Can affect performance.
Use animation cache
- Enable this checkboxx to keep in memory all animations played during the session. All animation assigned to a model will also be loaded the first time the model appear. Will increase the time you load the model the first time but make all animation switch instant. Can affect performance.
#
Debug Settings
Show grid
- Enable this checkbox to visualize the 3d grid, model dragging box and body hitboxes.
Reload button
- Click this button to reload the 3d scene, clear the cache and all VRM models. Use it if some bug occurs or if cache starts to hit performance.
#
Scene Settings
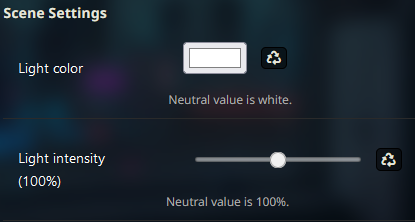
Light Color
- Set the color of the light in the 3d scene. Click on the reset button to set it back to the default white color. Depending on your browser you can use a color picker, for example you can color pick the color of your background image to add more immersion.
Light intensity
- Set the light intensity in percent using the slider. Click on the reset button to set it back to the default value of 100%. VRM model can react differently to light depending on the baked shaders into the model, play with the value and see how it goes.
#
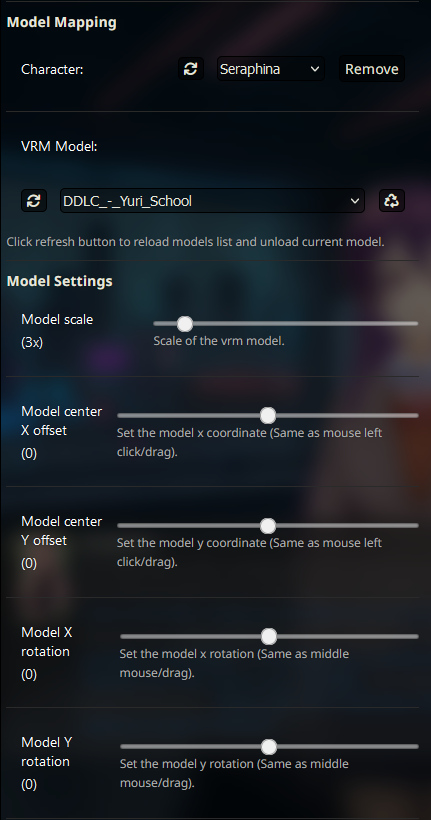
Character Selection
These settings allow you to manage characters and assign VRM models to them.
Refresh Button:
- Click the refresh button to update the list of characters in the current chat.
Select Character:
- Use the drop-down list to choose a character to assign a VRM model to.
Remove Button:
- Click this button to delete the assigned model for a character.
#
Model Selection
Refresh Button:
- Click the refresh button if your VRM model does not appear in the list.
Select Model:
- Choose a model from the list to assign it to the selected character.
- The model has to be located in
/data/<user-handle>/assets/vrm/modeldirectory.
Reset button
- Click this button to reset the model settings to its default. If you have animation files that correspond to the default value they will be auto mapped. See the naming mapping at the end of this README.
#
Model Settings
Model Scale:
- Use the slider to adjust the size of the model, making it larger or smaller.
Model Center X/Y Offset:
- Use those sliders to change the horizontal/vertical position of the model relative to the window center.
Model X/Y Rotation
- Use those sliders to change the horizontal/vertical rotation of the model relative to the model hips.
#
Remarks
- The settings are saved per model not per character and carry over different chats.
- If you want to use the same model for two different characters with different settings make a copy of the .vrm file.
- You can also drag the model with your mouse, and those settings will be updated and saved. Left click and hold to drag a model around the screen. Middle mouse Click and hold to rotate the model or use shift-left click. Use mouse wheel with cursor on the model to scale it up or down or use ctrl+left click.
- Use these UI settings to bring your model back on the screen if you somehow made it out of view. Also, check the "Show frame" checkbox to see clearly where you can click to drag the model.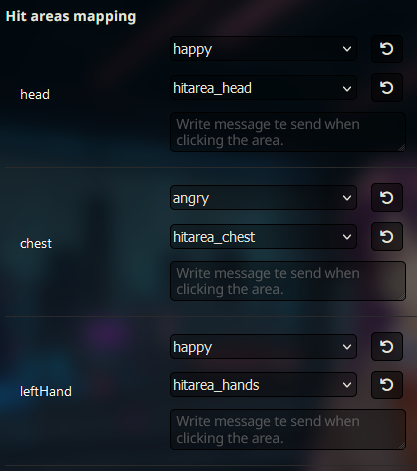
#
Hitboxes mapping
- Depending on the model bones definition some hitboxes area can be generated, they will be listed in this part of the ui, and you can assign an expression/animation/message to each of them that will trigger when you click the area.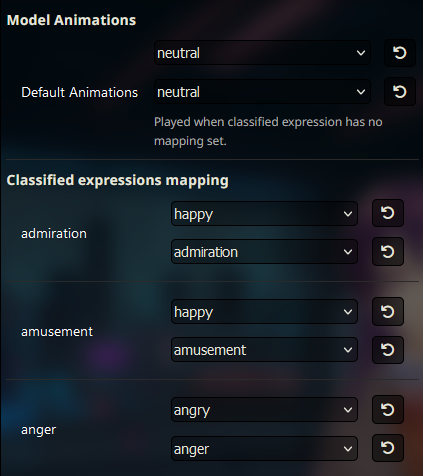
#
Classified Expressions Mapping
Requirements
- Requires the use of the classify expression extension; otherwise, it will fallback to the default animation.
Mapping
- For each detected emotion by the classify extension, you can assign an expression/motion/message. The message can contain commands.
#
Commands
/vrmlightcolor
- set the light color
- arguments: color
- example: "/vrmlightcolor white" or "/vrmlightcolor purple".
/vrmlightintensity
- set the light intensity in percent
- arguments: intensity
- example: "/vrmlightintensity 0" or "/vrmlightintensity 100
/vrmmodel
- assign the vrm model to the character
- arguments: character, model
- example: "/vrmmodel Seraphina.vrm" in solo chat or "/vrmmodel character=Seraphina model=Seraphina.vrm" in group chat
/vrmexpression
- change the expression of the model
- arguments: character, expression
- example: "/vrmexpression happy" in solo chat or "/vrmexpression character=Seraphina expression=happy" in group chat
/vrmmotion
- change the animation of the model
- arguments: character, motion, loop, random
- "/vrmmotion idle" or "/vrmmotion character=Seraphina motion=idle loop=true random=false"
#
Animations default mapping
If your animation file are named in the following way they will be mapped automatically when reseting a model settings. For example the files named "assets/vrm/animation/neutral.bvh" and "assets/vrm/animation/neutral1.fbx" will be automatically mapped as a group for default and neutral classified animation. Same goes for the hitboxes.
// Fallback
"default": "assets/vrm/animation/neutral",

// Classify class
"admiration": "assets/vrm/animation/admiration",
"amusement": "assets/vrm/animation/amusement",
"anger": "assets/vrm/animation/anger",
"annoyance": "assets/vrm/animation/annoyance",
"approval": "assets/vrm/animation/approval",
"caring": "assets/vrm/animation/caring",
"confusion": "assets/vrm/animation/confusion",
"curiosity": "assets/vrm/animation/curiosity",
"desire": "assets/vrm/animation/desire",
"disappointment": "assets/vrm/animation/disappointment",
"disapproval": "assets/vrm/animation/disapproval",
"disgust": "assets/vrm/animation/disgust",
"embarrassment": "assets/vrm/animation/embarrassment",
"excitement": "assets/vrm/animation/excitement",
"fear": "assets/vrm/animation/fear",
"gratitude": "assets/vrm/animation/gratitude",
"grief": "assets/vrm/animation/grief",
"joy": "assets/vrm/animation/joy",
"love": "assets/vrm/animation/love",
"nervousness": "assets/vrm/animation/nervousness",
"neutral": "assets/vrm/animation/neutral",
"optimism": "assets/vrm/animation/optimism",
"pride": "assets/vrm/animation/pride",
"realization": "assets/vrm/animation/realization",
"relief": "assets/vrm/animation/relief",
"remorse": "assets/vrm/animation/remorse",
"sadness": "assets/vrm/animation/sadness",
"surprise": "assets/vrm/animation/surprise",

// Hitboxes
"head": "assets/vrm/animation/hitarea_head",
"chest": "assets/vrm/animation/hitarea_chest",
"groin": "assets/vrm/animation/hitarea_groin",
"butt": "assets/vrm/animation/hitarea_butt",
"leftHand": "assets/vrm/animation/hitarea_hands",
"rightHand": "assets/vrm/animation/hitarea_hands",
"leftLeg": "assets/vrm/animation/hitarea_leg",
"rightLeg": "assets/vrm/animation/hitarea_leg",
"rightFoot": "assets/vrm/animation/hitarea_foot",
"leftFoot": "assets/vrm/animation/hitarea_foot"
Thank you for following this guide! Your SillyTavern experience is now enriched with animated and interactive 3D models.
#
Remarks
- The VRM model loaded by this extension are the .vrm files not the .vroid files.
- Animation files should be VRM compatible, you can use a tool like XR animation (https://github.com/ButzYung/SystemAnimatorOnline) to convert fbx/bvh animation file.
- You can create animation groups by having file with same name ending with different numbers for example: "idle1.bvh", "idle2.bhv", "idle3.bvh" will be considered as one group "idle" and when selected in a mapping a random one will played when triggered, can be use to add variety to animations.
- You can get curated animations from this repository: https://github.com/test157t/VRM-Animations-Pack-For-Silly-Tavern
- Nitral has some tutorial video about how to use the extension and the animation repo: https://www.youtube.com/@nitralai