talkinghead
THE SUPPORT FOR TALKINGHEAD WAS DROPPED IN SILLYTAVERN 1.12.13. THIS PAGE IS KEPT FOR HISTORICAL PURPOSES.
What is it?
An implementation of Talking Head Anime 3 Demo for AITuber. It possesses the following features:
- Generates random Live 2D-like motion actions from a single static image.
- Lip-syncs to the sound output from any TTS output.
This extension contains the original demo programs for the Talking Head(?) Anime from a Single Image 3: Now the Body Too project. As the name implies, the project allows you to animate anime characters, and you only need a single image of that character to do so. There are two demo programs:
The manual_poser lets you manipulate a character's facial expression, head rotation, body rotation, and chest expansion due to breathing through a graphical user interface, so you can save them as default expressions e.g., Happy, sad, joy, etc. ifacialmocap_puppeteer lets you transfer your facial motion to an anime character.
Hardware Requirements
You can use either CPU or GPU Modes (CPU is default). However, in CPU mode expect about 1 FPS, and in GPU mode on an RTX3060 I am getting about 9-10 FPS.
The ifacialmocap_puppeteer requires an iOS device that is capable of computing blend shape parameters from a video feed. This means that the device must be able to run iOS 11.0 or higher and must have a TrueDepth front-facing camera. (See this page for more info.) In other words, if you have the iPhone X or something better, you should be all set.
How to use
You must launch extras with the following modules for talkinghead to work: classify and talkinghead!
classify is required for the handling of the talkinghead.png file. Additionally, you may also use --talkinghead-gpu to load the blend models into GPU memory and make the animations 10x faster. It is highly recommended to use GPU acceleration! By default, once the program starts it will load a default image SillyTavern-extras\talkinghead\tha3\images\lambda_00.png. You can verify it is working by going to http://localhost:5100/api/talkinghead/result_feed or YOUR EXT URL:PORT/api/talkinghead/result_feed.
-
Once the server has started go to the Extension API tab and connect. Then simply select a character card to load. (
--enable-modules=classify,talkinghead --talkinghead-gpuwhen starting server.py) -
Now select the Character Expressions, if you check the image type talkinghead box the script will replace your current character expression with the result of
YOUR EXT URL:PORT/api/talkinghead/result_feedunchecking the box SHOULD return the image back to the original expression, however sometimes you have to send a new message to the chat to "reload" the image. -
If you do not have a talkinghead.png file in the character directory it will simply show either the default image or the last character card that had a talkinghead.png file. The animation source image is changed when the character card is changed.
-
Now open the character expressions scroll down to the talkinghead image and upload an image file that meets the requirements in the section below called "Constraints on Input Images".
-
Then check and uncheck the talkinghead box to reload the character. If the image is funny looking it is probably because it is not transparent / has no alpha layer. Otherwise, follow the instructions and template below.
Constraints on Input Images
In order for the system to work well, the input image must obey the following constraints:
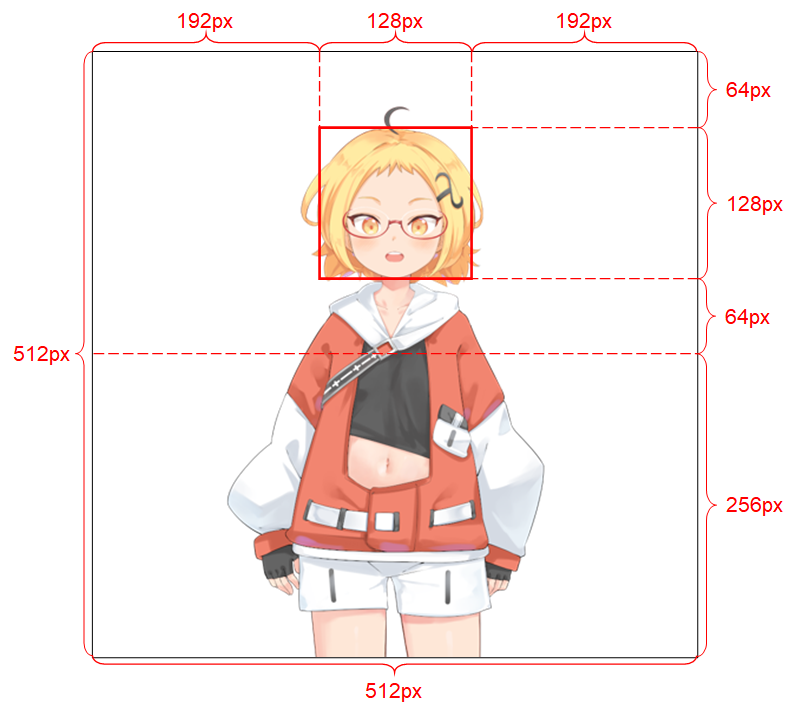
It should be of resolution 512 x 512. (If the program receives an input image of any other size, it will resize the image to this resolution and also output at this resolution.) It must have an alpha channel. It must contain only one humanoid character. The character should be standing upright and facing forward. The character's hands should be below and far from the head. The head of the character should roughly be contained in the 128 x 128 box in the middle of the top half of the image. The alpha channels of all pixels that do not belong to the character (i.e., background pixels) must be 0.
ADVANCED SECTION
Python Environment
In addition to the base feature (app.py), both manual_poser and ifacialmocap_puppeteer are available as desktop applications. To run them, you need to set up an environment for running programs written in the Python language. The environment needs to have the following software packages:
- Python >= 3.8
- PyTorch >= 1.11.0 with CUDA support
- SciPY >= 1.7.3
- wxPython >= 4.1.1
- Matplotlib >= 3.5.1
One way to do so is to install Anaconda and run the following commands in your shell:
conda create -n talking-head-anime-3-demo python=3.8 conda activate talking-head-anime-3-demo conda install pytorch torchvision torchaudio cudatoolkit=11.3 -c pytorch conda install scipy pip install wxpython conda install matplotlib
Additional Blend Models
There is only one (lightest) model included, if you want the additional blend models you need to download the model files from https://www.dropbox.com/s/y7b8jl4n2euv8xe/talking-head-anime-3-models.zip?dl=0 and unzip it to the SillyTavern-extras\talkinghead\tha3\models folder. In the end, the data folder should look like:
- tha3
- models
- separable_float
- editor.pt
- eyebrow_decomposer.pt
- eyebrow_morphing_combiner.pt
- face_morpher.pt
- two_algo_face_body_rotator.pt
- separable_half
-
- editor.pt
- two_algo_face_body_rotator.pt
-
- standard_float
-
- editor.pt
- two_algo_face_body_rotator.pt
-
- standard_half
-
- editor.pt
- two_algo_face_body_rotator.pt
-
- separable_float
- models
The model files are distributed with the Creative Commons Attribution 4.0 International License, which means that you can use them for commercial purposes. However, Pramook Khungurn. Talking Head(?) Anime from a Single Image 3: Now the Body Too. https://github.com/pkhungurn/talking-head-anime-3-demo, is the creator.
Running the manual_poser Desktop Application
Open a shell. Change your working directory to the repository's root directory. Then, run:
python tha3/app/manual_poser.py Note that before running the command above, you might have to activate the Python environment that contains the required packages.
conda activate extras if you have not already activated the environment.