Extras Installation
This page contains instructions for installing SillyTavern Extras on your local device.
Discontinued
The Extras project was discontinued in April 2024 and won't receive any new updates or modules. The vast majority of modules are available natively in the main SillyTavern application. You may still install and use it but don't expect to get immediate support if you face any issues.
Local installation of Extras can be difficult or impossible on your OS (especially Termux).
Use the Official Extras Colab
- Simple to set up
- Free to use
- No Colab GPU credits required (use the
use_cpuoptions) - See the
Colab Guide Page for details.
Running Extras in Colab
- Open the Official Extras Colab
- Select the desired "Extra" options
- select
use_cputo run Extras without requiring GPU credit- this will make Stable Diffusion slower, but everything else will run normally
- Not required, but recommended: select the
secureoption to generate the API key to protect your shared instance. - Click the Start button on the left (looks like a triangle 'play' button)
- Wait for it to finish loading everything
- Look for the
trycloudflare.comlink at the bottom of the output. Ignore the localhost link, it won't work (we tried!). - It will start with the text
Running on - Copy the API URL link that is listed under that line. (DO NOT copy the 'localhost' URL, use the other one)
- Start SillyTavern with extensions support: (set
enableExtensionstotruein yourconfig.yamlif necessary) - Navigate to SillyTavern's Extensions menu (click the 'stacked blocks' icon at the top of the page).
- Paste the API URL into the box at the top. (NOT the API Key box)
- If you have NOT enabled the
secureoption, make sure the API Key box is completely empty when using the official colab. - If you have enabled the
secureoption, paste the generated API key into the API Key box. - API key will appear in the colab's console output, for example:
Your API key is fee2f3f559 - Click "Connect"
Local Installation Methods
MiniConda (recommended)
This method is recommended because Conda makes a 'virtual environment' for the Extras requirement packages to live inside, so they do not affect your system-wide Python setup.
Install Miniconda
(Important!) Read how to use Conda
Install git
(Chads who installed SillyTavern with git to begin with can skip this step!)
After you have both of them installed...
Type/paste the commands below
ONE BY ONEIN THECONDA COMMAND PROMPT WINDOWand hitEnterafter each one.Create a new Conda environment (let's call it
extras):conda create -n extrasActivate the new environment
conda activate extras(you should see(extras)pop up on the left side of your command prompt)Install the required system packages (this will take some time)
conda install python=3.11 gitClone the Extras GitHub repo
git clone https://github.com/SillyTavern/SillyTavern-extrasNavigate to your cloned Extras repo
cd SillyTavern-extrasInstall Extras' requirements by using one of the following commands (will take time, again):
pip install -r requirements.txt- for basic featurespip install -r requirements-rvc.txt- for real-time voice cloningpip install -r requirements-coqui.txt- for Coqui TTS (not recommended)
See the
Common Problems page if you get errors at this step!See below 'Running Extras After Install'
System-Wide Installation
This is easier, but will affect your system-wide Python installation.
This can cause conflicts if you work with many Python programs that have different requirements.
If this is your first time touching anything Python-related, that should not be a problem.
- Install Python 3.11: https://www.python.org/downloads/release/python-3115/
- Install git: https://git-scm.com/downloads
- Open a command prompt window and go to a folder in which you have complete access permissions.
- Clone the repo:
git clone https://github.com/SillyTavern/SillyTavern-extras, hit Enter. - After the clone has finished, type
cd SillyTavern-extras, hit Enter. - Type
python -m pip install -r requirements.txt - See below 'Running Extras After Install'
Running Extras After Install
Confirm extensions are enabled
- Open the file called
config.yamlin a text editor. The file is located in ST's base install folder. - Look for the line that reads
enableExtensions. - Make sure that line has
true, and notfalse.
Decide which module to use
(This only needs to be done once)
- Extras is always started with a Python command line.
python server.pyis the bare minimum, but it does not enable any useful modules.- to enable modules you must use the
--enable-modules=modifier, with a comma-separated list of module names
Example: python server.py --enable-modules=caption,summarize,classify
This would enable Image Captioning, Chat Summary, and live updating Character Expressions.
Below is a table that describes each module.
- Decide which modules you want to add to your Python command line.
- They will be used in the next step.
NOTE: There must be no spaces at all in your Python command's module list!
Start Extras Server
While still in your command prompt window inside the Extras installation folder...
- Make sure your conda environment is active (if you used the Conda install method)
- Type
activate extrasif the environment is not active. - Type
python server.py --enable-modules=YOUR,SELECTED,MODULE,LIST,HERE - The extras server will load.
- After a while it will show you a URL at the end. For local installs, this defaults to
http://localhost:5100. - Copy the API URL.
Connect ST to the Extras server
- Start your SillyTavern server, and view the SillyTavern interface in your browser.
- Open the Extensions panel (via the 'Stacked Blocks' icon at the top of the page)
- Paste the API URL into the input box.
- Click
Connect.
To run Extras again, simply activate the environment and run these commands in a command prompt.
conda activate extras, Hit Enter.
python server.py, Hit Enter.
Be sure to use the additional options for server.py (see below) that your setup requires.
Make a .bat File for Easy Startup
This is Optional and only applies to Windows, but something similar should be possible on MacOS.
- View your Windows Desktop
- Right-click, select
New, and then clickText Document - A new file will appear on your Desktop, asking for a name.
- Name the file
STExtras.txt - Open the newly created file in a text editor.
Paste the following code into it:
cd C:\_your_\_full_\_Extras_\_folder_\_path_\ call conda activate extras python server.py --enable-modules=YOUR,SELECTED,MODULE,LIST,HERE,WITH,NO,SPACES call conda deactivate pause- Replace the placeholder folder path with your actual Extras install folder path.
- Replace the python command line with your actual command line
- Save the file with a new name
STExtras.bat(UseFile>>Save Asin most text editors)
You can now simply double-click on this .bat file to easily start Extras.
If you ever want to change the module list (or any other command line modifiers for the extras server), simply edit the python command inside the .bat file.
Extras Install Common Problems
This section lists common questions and problems encountered while installing SillyTavern Extras.
Error: Could not import the 'talkinghead' module on Linux
It requires the installation of an additional package because it's not installed automatically due to incompatibility with Colab. Run this after you install other requirements:
pip install wxpython
Extras server can't connect to AUTOMATIC1111's Stable Diffusion Web UI
Could not connect to remote SD backend at http://127.0.0.1:7860! Disabling SD module...
Make sure webui-user.bat that you start Stable Diffusion with contains --api command line option in the COMMANDLINE_ARGS variable.
Find and replace that line in your "webui-user.bat": set COMMANDLINE_ARGS=--api
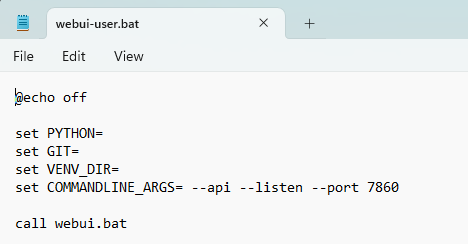
If the API mode is disabled for SD Web UI, the Extras server won't be able to make a connection and you won't be able to generate images!
Still doesn't work?
Ensure that you start everything in the proper order, waiting for every program to finish loading before proceeding to the next step:
- Stable Diffusion Web UI
- SillyTavern Extras
- SillyTavern
The extras server can't reconnect to the Stable Diffusion API if it was loaded after.
hnswlib wheel building error when installing ChromaDB
ERROR: Could not build wheels for hnswlib, which is required to install pyproject.toml-based projects
Before installing the ChromaDB module you must first do one of the following:
- Install Visual C++ build tools: https://visualstudio.microsoft.com/visual-cpp-build-tools/
- Install the
hnswlibpackage with conda:conda install -c conda-forge hnswlib
Error when installing Python requirements on Mac
ERROR: No matching distribution found for torch==2.0.0+cu117
Mac does not support CUDA, so torch packages should be installed without CUDA support.
Install the requirements using the requirements-silicon.txt file instead.
Missing modules?
- You must specify a list of module names in your Python command line, with the
--enable-modulesmodifier. - See
Modules section.
What is the API Key box for?
- The API Key box in SillyTavern's Extensions panel is only used when you have:
- created a text file named
api_key.txtin your Extras install folder, which contains your chosen Extras 'password'. - started extras with the
--securecommandline argument.
- created a text file named
- This makes the Extras API 'password locked', so only users who have that key in their API Key box can access it.
- This is mainly useful for people who want to make their own public deployment of Extras (colab, etc).
- Users running Extras on their own PC for personal use should not type anything into the API Key box.
What about mobile/Android/Termux? 🤔
- There are some folks in the community having success running Extras on their phones via Ubuntu on Termux.
- However, Extras were not made with mobile support in mind.
- No support will be provided for people running Extras on their Android devices.
- Direct all your questions to the creator of the guide linked below instead.
❗ This is UNSUPPORTED
https://rentry.org/STAI-Termux#downloading-and-running-tai-extras